Powered By Blogger

Saturday 30 November 2013

How to propagate olives trees

Olive trees are easily propagated from stem cuttings.

1. Cut 15 cm - 20 cm long and about 1 cm thick cuttings from the current years olive growth in September or October. The selected stems should be healthy and have lots of leaves.

2.  Fill pots with a mixture of sterile potting compost and sand. 

3. Prepare the cuttings for rooting by removing all but two pairs of leaves and dipping the base of the stem into a rooting hormone. 

4. Push cuttings into individual pots so that they stand upright, making sure some of the bare leaf nodes are under the soil. 

5. Water the pots deeply and cover with a secured plastic bag to retain moisture. 

6. Place the pots in a part shaded area and make sure they do not dry out by re-moistening if needed.

7. Roots should begin to form at 7-9 weeks. Re-pot the cuttings after 10-12 weeks and add some liquid fertliser to encourage growth.

8. Allow the trees to become well rooted before planting out. Once planted keep well watered until established.

Friday 29 November 2013

Growing Yacon (Apple of the Earth)

We are always on the lookout for new vegetables to try and have been researching into Yacon (Smallanthus Sonchifolius) a South-American perennial white tuber. It looks well worth a try and we are looking to get some tubers to grow.

The tuber looks like a baking potato but apparently tastes more like a cross between and apple and celery with a high liquid content which means it can be juiced to make a sweet honey like syrup.

The tubers are a close relative of sunflowers and Jerusalem artichokes and grow up to 2 metres tall with yellow flowers. The plant produces two types of underground tubers, small reddish rhizomes used for propagation and large brown tubers for eating. The larger ones can weigh anything between 300 grams and a kilogram. Apparently any rhizomes left in the ground, in non-frosting areas, will re-emerge in the Spring.

If you live in a frost zone, the rhizomes can be stored in moist sand and planted out in the early Spring. Plant in loosened soil at 3 cm deep and about 100 cm apart. They do not appear to be too fussy and will apparently thrive in most soils but prefer a soil rich in organic matter. Mulch deeply and the plant will grow through the mulching. Has moderate water needs and needs to be kept moist rather than soggy. The plants reach maturity after about 6 months and are harvested after the flowers and stems die back. Apparently drying the tubers in the sun for up to 2 weeks will sweeten them.

The tubers can be enjoyed raw or juiced but can also be boiled, steamed or baked. Strips can also be sun dried to produce a sweet crunchy snack. However enjoyed the tubers have the added benefit of being high in fibre but low in calories.

All we now have to do is obtain some rhizomes and give them a try. If anybody has any spare out there we would be willing to pay for postage and packing.

Thursday 28 November 2013

List of Drought Tolerant Food Crops

Throughout the world weather patterns seem to be changing. For example, droughts in Cyprus are becoming more frequent but is this just cyclical or the growing impact of climate change.  

Climate change is predicted to lead to more rainfall globally but the distribution is likely to change with some regions experiencing more droughts and others more floods.

If you are in a region that is likely to experience more droughts It may be worth considering switching to growing more drought tolerant crops. These crops will need water to germinate and during their early stages of growth but can cope with dryer conditions once established.

If water availability for supplementary watering is limited it is good practice to space plants further apart than normal to give roots more space to search for available water. Mulching will also help to keep the ground cooler, retain any moisture and If you use organic matter it will break down to feed the soil.

The following are vegetables, trees, vines and herbs you might want to consider as insurance against drought conditions and which will ensure you will still obtain some sort of crop.

Vegetables: amaranth, garlic, onions, purslane, spinach, sweet potatoes, asparagus, black eyed beans (or cow peas), chickpeas, peanuts, leeks, melons, okra, pumpkins, tomatoes, parsnips, carrots and rhubarb.

Fruits: apricots, date plams, avocado, carob, mulberries, figs, grapes, peaches, pomegranates, olives, goji berries and prickly pear 

Nuts: almonds, walnuts and pistachio (once established)

Herbs: fennel, borage, calendula, dandelions, lavender, rosemary, savory, thyme, wormwood, garlic chives, oregano and chives.

Wednesday 27 November 2013

Propagating Globe Artichokes

Globe artichokes (Cynara Scolymus) are a wonderful perennial, if space permits, which produce an abundant crop of nutritious hearts.

They are best grown in a position that enjoys full sun, in a well draining soil but a soil which is moisture retentive.

We planted a row of purple headed globe artichokes from offsets in 2011 and as they are coming up to their third year of cropping and it's time to consider replacing them before their productivity lessens.

We removed offsets from our existing plants, to leave about 6 plants, and set out another row. When
removing offsets use a sharp spade to divide the offsets from the plant, try to leave as much root as possible attached and then remove most of the larger leaves. Set the offsets about 1.5 meters apart but beforehand add some manure to each planting hole.

In there first year of growth, presuming they all take, the plants will not usually flower but it's good practice to remove any flower heads which do appear to give the roots time to get established. So we will crop the original row for a further year before keeping some offsets and digging the plants out completely.

During our replacement cycle we will have one year when both rows are cropping but we will cope with the surplus somehow. Once prepared any surplus globe artichoke hearts can be preserved by freezing or in olive oil.

There are numerous globe artichoke recipes to try but a traditional Cypriot recipe is to stuff the hearts with mince meat and rice dolma style.

But one recipe which we look forward to when the globes are in season is soup. Follow the link to try globe artichoke soup which also contains instructions on how to prepare the globes for cooking -http://cyprusgardener.blogspot.com/2011/06/globe-artichoke-soup.html

Tuesday 26 November 2013

Is the World heading towards food shortages? Are you prepared?

With supermarket shelves packed full of food its no surprise that most people are oblivious to the fact that food shortages and price increases will become a growing problem over the coming decades.

So why is there a problem? Well firstly the world's population is projected to increase to 9.6 billion by 2050 from a current figure of 7.2 billion. That's a staggering 30% more mouths to feed in just 36 years time. To feed everyone it has been estimated that world agricultural production will need to double.

However, the amount of land used for food production is reducing. Land used for food is increasingly being used for bio-fuels, there are growing water shortage problems and the effects of climate change are expected to reduce productivity. Added to these problems is changing food demands as developing countries become more affluent. For example, it takes 10 kg of grain to produce 1 kg of meat and meat consumption in China has quadrupled in the last 30 years.

At the same time the vast majority of our food system is built upon the unsustainable flow of cheap oil. With peak oil expected sometime between 2020 and 2030 the price of oil will increase. This will put pressure on a food industry heavily dependent on oil. for driving machinery, producing fertilisers and pesticides, processing crops and distribution networks.

What can we do to prepare for increasing shortages and food inflation?

1. Re-skill by learning about growing your own organic fruit, vegetables and herbs. Learn how to preserve your crops and how to cook from scratch. Learn how to save your own seeds.

2. If space permits keep chickens which will provide eggs and meat, manure and clear bugs from your garden.

3. If money permits buy products in bulk that have a very long shelf life such as rice, dried beans, salt, sugar and oil. This will provide a back-up if shortages occur and will probably save you money as prices increase.

4. Gradually buy equipment that is essential to preserve your crops such as a dehydrator, a preserving pan and a good pressure cooker for bottling.

5. Teach yourself about foraging for free food, fishing and hunting.

Monday 25 November 2013

Gardening on the Cheap - 10 Frugal Tips

With the price of food steadily increasing growing your own food is becoming more and more popular. Growing your own will not only save you money but your food will taste better and be more nutritious.

But its easy to get carried away when starting out gardening by purchasing expensive gadgets, tools, equipment and spending large amounts of money at garden centres. But there are alternatives and the following 10 frugal tips will hopefully go some way towards keeping your cost to a minimum.

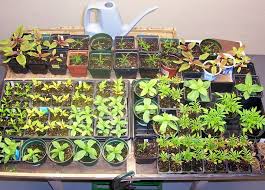
Tip 1 - Start your plants from seed - Buying packets of seeds is relatively cheap in comparison to buying plants. Keep an eye out for end of season sales when most seed merchants reduce their prices. There are usually too many seeds in a packet to use, so consider swapping some of your seeds with gardening friends or join an exchange club which is a good way of halving the cost of your seeds. 

Once plants are growing, try saving your own seeds. Follow the link for general guidance but you can search our blog for more detailed information on seed saving for most vegetables. http://cyprusgardener.blogspot.com/2011/06/saving-your-own-vegetable-seeds.html Save your own and you will have plenty of seeds for yourself, to swap or share with friends. 

You can even remove seeds, and successfully germinate them. from supermarket produce. This can save money on some expensive seeds such as cherry tomatoes and peppers. 

Don't throw out seeds just because the expiry date has gone, the germination rate will reduce but you may still get a 50% success rate from seeds where the expiry date is up to two years. After four years past the expiry date most seeds are no longer viable.

Keep some of your harvest for re-planting the following season, this works well with potatoes, Jerusalem artichokes, and garlic. You can also plant out any potatoes or garlic that have sprouted before use.  

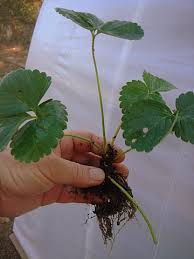
Tip 2 - Multiply your plants - By propagating and dividing plants, you can make more plants. Most plants can be propagated by one method or another and these can also be swapped with friends, allowing you to obtain plants you don't have and these can themselves, once established, can be multiplied into yet more plants. 

There are various methods of propagation and the choice of method is dependant on the plant. Always choose a healthy plant for propagating and research the appropriate method for the plant to be propagated before proceeding. Even with care, only between 60% to 70% of propagations will succeed. Before proceeding, you will need a sharp pair of secateurs, pots, rooting compost and rooting hormone. Always ensure your equipment has been thoroughly cleaned before re-use. 

Temperature control is a very important factor in ensuring successful propagation. The ideal temperature for most cuttings is between 10C and 21C. The easiest way to ensure a constant temperature is by using an electric propagator which will re-pay the initial outlay very quickly in producing new plants and also allow you a head start in seed germination.  

It is also important to ensure moisture is controlled by either placing and securing a plastic bag over the pot, by propagating cuttings in water or by regularly spraying cuttings placed in an electric propagator. 
Cuttings can be taken from softwood or hardwood depending on the plant to be propagated. Most perennials are propagated from softwood cuttings in the spring or summer. Always select new growth for cuttings and ensure the stem has not flowered or fruited. Take a 10cm to 20cm cutting just below a leaf joint  which has at least two leaf joints and insert half your cutting, after dipping in rooting hormone, into your rooting compost. Tomatoes can be multiplied by taking cuttings as stems readily root. 

Many fruit trees and bushes and vines, such as blackcurrants and grapes, are propagated from hardwood cuttings in the autumn or winter. Take 15cm to 45cm cuttings from new growth which has not fruited or flowered and with at least two leaf joints. These can be rooted directly in the ground or in containers outside, after brushing the tip with rooting compound, and will root, depending on the parent, in between two and twelve months. 

Bud cuttings are used for plants with long stems. such as grape vines. Remove a section of stem between two leaves and insert, after dipping in rooting compound, below a bud into your rooting compost. Alternatively, take 8cm cuttings with a bud in the centre. Remove a slither of wood on the opposite side to the bud and insert horizontally into a mixture of sand and peat with the cut edge downwards. Just cover the cuttings, place in a propagator and germination usually occurs within 2-4 weeks. Pot-up the plants once leaves appear and once established plant out.

For plants consisting mainly of leaves, with very few or no stems such as the prickly pear, leaf cuttings may be used for propagation. Cut off a fully mature leaf and cut sections of 2.5cm across the leaf and, after dipping in rooting compound, insert upright halfway into rooting compost. 

Root cuttings are used to propagate some trees, shrubs and herbaceous perennials such as the passion flower. Expose the roots and take cuttings of 2.5cm to 7.5cm from roots which are at least 0.6cm thick. Cut flatly at the top of the root and diagonally at the bottom end, the cutting should be fully inserted into the rooting compost with the diagonal end first. 

Plants such as strawberries and globe artichokes can be propagated by planting off-shoots. Strawberry offshoots can be placed into pots and cut away from the parent once established. Globe artichoke offshoots can be detached carefully from the parent, replanted and kept well watered until established.
Layering can be used for plants such as rosemary, jasmine and fruiting bushes such as kiwi and blackberry. Bury the tips of stems and after a period roots will develop on the buried tip and the new plant can be detached from the parent. 

Removing suckers, from figs and raspberries for example, is another propagation method. Carefully expose the base of the sucker and cut as close as possible to the parent. Plant as soon as possible after removal and keep well watered until established. 

Division is a further method of propagation and can be used for plants such as lemongrass and comfrey. Use two spades to split established plants down the middle and replant. 

Tip 3 - Free Containers - Do not throw out containers such as milk or juice cartons, cardboard egg boxes or toilet rolls. These can all be re-used for sowing seeds. Toilet rolls are good for raising peas, beans and even beetroot, which does not like being transplanted, just fill the toilet roll with compost and when the seedlings are strong enough plant out. The toilet roll will help retain moisture and eventually rot away. Cut off the tops of cartons, wash out and cut drainage holes in the bottom to use as pots. The bottom section of egg boxes can be filled with compost and used to raise seedlings. Like toilet rolls, these can be cut apart and planted into the soil where they will rot down. You can even try making your own pots from newspapers by rolling round a cylinder and folding  into the base to secure. 

Tip 4 - Manure, compost and mulch - To keep your gardening costs down, make your own compost, obtain manure from friendly farmers of livestock keepers and use a variety of materials for mulching. Mulches keep down weeds, feed your crops and reduce watering needs and can be made from shredded newspapers, seaweed, coffee grounds, hay, leaves, sawdust, wood shavings and black plastic.    

Tip 5 Organic Pest Control - Don't rush out to buy expensive organically safe products when pests or diseases appear, firstly try and make your own insecticides and pesticides. Follow the link to make your own -  http://cyprusgardener.blogspot.com/2013/02/homemade-organic-weedkiller.html Or if fruit flies are a problem follow the link to make your own trap - http://cyprusgardener.blogspot.com/2013/10/how-to-make-fruit-fly-trap.html

Tip 6 - Make Your Own Compost Bin

Simply google for numerous links to instructions and you can build one using pallets or recycled timber to keep cost to a minimum.

Tip 7 - Grow Bamboo

If space allows grow bamboo for use as beanpoles, trellising ans so many other gardening uses. However, bamboo can be invasive so be careful where you plant it.

Tip 8 - Recycle

Here are just a few examples but use your imagination before discarding everyday items. Cut off the bottom of large plastic bottles to make mini greenhouses. Use old tights as garden ties or to hang onions for storage. Make your own plant labels using cut-up cartons or plastic knifes, spoons and forks.

Tip 9 - Pea Sticks

When pruning trees put trimmings to one side to use a pea sticks when dried. We find our olive pruning's make great pea sticks.

Tip 10 - Surplus Produce

Hopefully your garden will produce bountiful crops cheaply but you can get even more out of it by turning any surplus fruits and vegetables, which have not been frozen, dried or juiced for later use, into jams.and chutneys. Not only will these save you money on your food bill but you can swap or barter any excess for plants, seeds or any crops somebody else has in surplus

Sunday 24 November 2013

Pear and Lemon Jam

We were but out foraging a few days ago and came across a wild pear tree buts its fruit was very hard. 

We would normally preserve pears by bottling in syrup (for information on bottling follow the link - http://cyprusgardener.blogspot.com/2011/06/how-to-preserve-fruit-by-bottling.html - but with these rock hard pears we decided the only option was to make them into a jam. 

You can never have enough stored jam which is always handy for gifts or to swap for produce somebody else has a surplus of. Bartering jars of jam for marrows is better than cash and both parties are happy.

Ingredients needed - 1 litre of water; 2 kg of peeled, cored and chopped pears; 3 lemons of which you need to thinly peel the skin, chop finely and then juice and 1 kg of granulated sugar. 

Step 1 - Add the pears to the water with the lemon juice and peel, bring to the boil and simmer until the pears are just tender. 

Step 2 - Add the sugar and stir until dissolved. 

Step 3 - Bring back to a boil, stirring occasionally, until setting point is reached. This should take between 20 and 25 minutess. Check for setting by placing some jam onto a plate for a minute or so until a crinkled skin is formed and the jam is sticky. 

Step 4 - Pour into sterilised jars and seal. Once cooled clean off any excess, label and date. 

Step 5 - Store in a cool and dark place.

Thursday 21 November 2013

Orange and Lemon Marmalade Recipe - Step by Step

We love the tangy taste of our homemade marmalade which is very easy to make. Follow these step by step instructions to make your own.

Ingredients: 9 medium oranges, 2 lemons and 1.4 kg of sugar. The sugar can be adjusted depending on how sweet you prefer your marmalade from between 1.3 kg to 1.5 kg.

Step 1 - Thoroughly wash the fruit and peel thinly to leave as much pith as possible on the fruit.

Step 2 - Remove as much pith as you can from the fruit and quarter.

Step 3 - Pulp the fruit in a processor and then blend it.

Step 4 - Thinly slice the peel into strips and then cut into smaller pieces.

Step 5 - Place the blended fruit, peel and sugar into a large pan and bring to the boil for 20 minutes, stirring until the sugar dissolves and then occasionally.

Step 6 - After around 20 minutes check for setting by spooning some mixture onto a cold plate and leaving for a minute. If the surface starts crinkling and it feels sticky to touch it is ready to pour.
Step 7 -  Pour whilst hot into pre-sterilised jars and seal.
Step 8 - Once cooled wash off any excess and when dry label and date.

Step 9 - Use within 6 months but keep in fridge once opened.

Tuesday 19 November 2013

How to make Sun tea with garden herbs

We are always looking for energy saving ideas. So why not try sun tea which uses the suns rays to brew a delicious tasting herbal tea rather than electricity or gas..

All you need is a large glass jar, which has been sterilised, and can be sealed to keep out insects, some well washed freshly picked herbs and water.

For every cup of herbs add two cups of water to the jar, seal and place in a position outside which enjoys the days sun for at least six hours. During the day give the jar a couple of shakes to mix the contents.

At the end of the day your tea is ready for use and can be sweetened if required. The tea will be a rich colour, give it a shake to mix and strain. If you find the tea is too strong dilute with more water. You sun tea should be used within a day as it will sour quickly.

There are lots of herbal combinations to try. We find lemon balm and mint delicious. Experiment with herb and edible flower combinations. You can even add a slice of any citrus fruit for added flavour.

Friday 15 November 2013

Cypriot Traditional Recipes - Food of Cyprus

Cypriot cuisine has been shaped by the island's climate, geography and history and evolved to encompass both Greek and Turkish cuisine. The cuisine has further been influenced by Middle Eastern and Arabic countries and by past occupations by Luisignan Franks (French), Venetians (Italian) and the British. The following recipes contain many traditional Cypriot recipes which are used when produce is in season and brings together in one place many previous blogs. Just follow the links to any recipe which you fancy trying. 

1 - Okra in Tomato Sauce http://cyprusgardener.blogspot.com/2011/06/okra-in-tomato-sauce.html

2 - Olive Bread - http://cyprusgardener.blogspot.com/2011/07/pitted-black-olive-bread-recipe.html

3 - Kofte (Meatballs) - http://cyprusgardener.blogspot.com/2011/08/cypriot-kofte-or-meatballs-recipe.html

4 - Kolokas or Kolokasi - http://cyprusgardener.blogspot.com/2011/08/cypriot-taro-kolokass-or-kolokasi.html

5 - Lokma (Donoughts) - http://cyprusgardener.blogspot.com/2011/08/cypriot-lokma-or-crisp-doughnut-recipe.html

6 - Dolma (Stuffed Vine Leaves) - http://cyprusgardener.blogspot.com/2011/08/cypriot-dolma-
or-stuffed-vine-recipe.html

7 - Trahana or tarhana (Cracked Wheat Soup) - http://cyprusgardener.blogspot.com/2011/07/cypriot-trahana-tarhana-or-cracked.html 

8 - Molohiya - http://cyprusgardener.blogspot.com/2011/07/molohiya-or-tossa-jute-vegetable-stew.html

9 - Black eyed beans  - http://cyprusgardener.blogspot.com/2011/07/cypriot-black-eyed-bean-recipes.html

10 - Squash Pastries - http://cyprusgardener.blogspot.com/2011/07/cypriot-squash-pastries-recipe.html

11 - Tahini - http://cyprusgardener.blogspot.com/2011/07/make-your-own-tahini.html

12 - Candied Orange Peel - http://cyprusgardener.blogspot.com/2012/01/candied-orange-peel.html

13 - Candied Watermelon Rind  - http://cyprusgardener.blogspot.com/2012/01/candied-watermelon-rind-recipe.html

14 - Sucuk or Soutzoukos - http://cyprusgardener.blogspot.com/2013/10/sucuk-or-soutzoukos-recipe.html

Thursday 14 November 2013

Natural Sweetener - Homemade Fig Syrup

If you are researching  for a way to make your own natural sweetener, fig syrup is an ideal way to replace processed sugar and can be used when baking, in beverages, in smoothies and on cereals.

Fig syrup has been made for centuries in many Mediterranean countries and is a honey like syrup which is dark brown in colour and very sweet. It's a  great way of preserving and using any over-ripe surplus of figs you have. Your homemade fig syrup will keep in sealed jars for years so it’s worthwhile making as much as you can.

Every 10 kg of figs will make about 500 ml of syrup. 

Wash the figs thoroughly, cut them in half and place them in a large pot with enough water to cover them. 

Bring to the boil and to simmer for about 90 minutes. After about 15 minutes, using a masher, squash the figs. Stir occasionally and gradually the liquid will reduce by about a half. 

Once slightly cooled, pour the mixture into a cheesecloth, hung between two chairs, over a large bowl. The liquid will gradually, over quite a few hours, drip into the bowl. After the dripping has stopped you can squeeze the cheesecloth to remove any remaining juices.

Put the liquid back into a pot and bring to the boil and simmer gently until it turns into a thick syrup. This can take anything from 45 to 90  minutes. 

Pour your syrup into pre-sterlised jars and seal. Once completely cooled, clean off any excess and store in a cool dark place.

Wednesday 13 November 2013

Pomegranate and Lime Ice Lollies

Nothing is better on a hot day than an ice lolly to cool you down. So why not try making your own ice lollies which will cost a fraction of supermarket prices, be healthier, more nutritious and taste better. There are numerous recipes to choose from and to make them even cheaper why not use your own homegrown fruit.
If you are going to make ice lollies regularly it will be well worth buying an ice lolly mould set which has built in sticks. Most allow you to make between 4 to 8 lollies of various sizes, cost as little as £1.50 and can be used over and over again. 
The following recipe uses pomegranates and limes which are both available in our garden at this time of the year.

You simply need; 3 cups water; 1 cup of squeezed (or purchased) unsweetened pomegranate juice; the juice of 2 medium limes and 1/2 cup sugar (less or  more depending on taste)

Boil the water, add the sugar and stir until the sugar is completely dissolved. 

Remove from heat, pour in pomegranate juice and lime juice and stir thoroughly.

Allow to completely cool, re-stir and and pour into lolly moulds to freeze.

Enjoy

Tuesday 12 November 2013

How to Sun Dry Figs

The lack of rain this year has had an impact on the olive crop but the fig trees are full of fruit. A traditional Mediterranean way to preserve some of the crop for winter use is to sun dry figs 

Figs, for drying, should be allowed to ripen to sweetness before picking but not allowed to become over-ripe and too soft. 

Prepare figs for drying by submerging in boiling water for about 30 seconds. This kills any insects or growth on the figs surface and helps with the drying process. Boiling is best done using a colander which can then be submerged in cold water to avoid cooking the figs. Place the drained figs of a tea-towel to dry off. Once dry cut the figs into halves ready for drying.

The best thing to use for sun drying is an oven tray with a wire rack which allows for good air circulation. Place the figs on top of the wire rack and cover with insect proof netting to deter any bugs. Placing the tray quite near the house should also prevent any birds from trying to have a nibble. 

Dry the figs during the day for 4-7 days depending on the strength of the sun but bring the fruit in at night to avoid spoiling by night-time humidity. The figs will be dried when they feel leathery on the outside and no juice emerges from the center when squeezed.

As a final safety precaution, freeze the dried figs for 2-3 days, to absolutely ensure any insects are killed. Your dried figs will keep for about six months if kept in an airtight container.

Monday 11 November 2013

Lime pickle - make your own

The lime tree we planted four years ago has started bearing some fruit. One way of preserving some of our crop is by making lime pickle. A pickle used traditionally in Asia to ease the hot taste of the curries. Our recipe contains only one tablespoon of salt, in comparison to most lime pickles which contain very high levels of salt and are sweet but consequently salty.

You will need the following ingredients to make about 3 jars.

8 limes
4 Tbs of cooking salt (3 for soaking limes and 1 for cooking)
2 Tbs of olive oil
1 tsp of cardamom seeds
1 tsp of fenugreek seeds
2 tsp of mustard seeds
2 tsp of ground cumin 
4 crushed garlic cloves
1/2 to 1 tsp of chili powder depending on how hot a pickle you prefer
1 Tbs of grated ginger
250ml of water
2 Tbs of white vinegar
350g of brown sugar

Place the limes in a bowl filled with cold salty water and soak overnight which will soften the limes. Drain, cut off the tops and bottoms and slice the limes into small chunks.

Grind the cardamom, fenungreek and mustard seeds. Heat the oil and add the ground seeds to the pan and mix in cumin, garlic, chilli and ginger. Cook for a few minutes to merge and release all the flavours.

Place the lime chunks, water, vinegar and sugar into the pot and mix thoroughly Gradually bring the mixture to a boil but keep stirring until all the sugar is fully dissolved. Boil the mixture for another five minutes.

Remove the pot from heat and spoon into pre-sterilised jars and seal whilst hot.

Once the jars have cooled completely wipe of any excess pickle and store in a dark cool place. The lime pickle will taste better if left for about 4 weeks and will keep up to 6 months.

Friday 1 November 2013

Why are red grapes better for you than white grapes?

We have planted both red and white grape varieties and being interested in nutrition have been wondering why red grapes and red wine are always regarded as better for your health.

Well it appears that red grapes contain beneficial compounds called flavonoids (antioxidants) which produce the grapes colour. These flavonoid compounds include quercitin and resveratrol which have been shown to reduce the risk of heart disease, reduce blood pressure and protect good cholesterol from free radical damage. Green grapes contain much lower levels of these beneficial antioxidants and consequently do not provide the same health protection. 

Red grapes, wine and grape juice also offer some protection to individuals on high fat diets, as research has shown people regularly consuming these products often have a lower risk of heart disease than the general population on the same dietary pattern.

So now we know why nutritionists recommend red over white but we will still continue to enjoy both when they are in season.

The Mediterranean diet is under attack by junk food

The traditional Cypriot diet along with other Mediterranean diet's generally guaranteed most individuals a healthy weight and a long disease free life. Scientific studies into these benefits has meant the traditional Mediterranean diet has gained followers all over the world. 

A diet low in animal fat intake and high in fruit, vegetables, nuts, fish and olive oil has been proven to be the basis for a healthy life. But Cypriots in ever larger numbers are abandoning their traditional diet for convenience and junk foods and as a consequence there is a rapid growth in obesity, type 2 diabetes and heart disease. 

The traditional Cypriot diet was the diet of poor rural subsistence farmers, who typically did
hard physical work and did not earn enough money to eat red meat regularly. Diets included wholegrain bread, potatoes and other cereals. They ate cooked meals, soups and salads rich in olive oil and accompanied by beans, lentils, vegetables and foraged foods. Seasonal fresh fruit was an important part of their diet. Milk intake was low but cheese and yogurt were eaten regularly. Meat was expensive and most villagers ate chicken, fish or hunted game. Wine was consumed in moderation and generally accompanied food. 

Rising living standards, sedentary lifestyles and the globalization of food have completely changed this situation. With more disposal income people are abandoning traditional diets and switching to supermarket convenience and take-away junk foods which are high in salt, sugar, an array of artificial chemicals and animal fats. In just a few decades the number of fast food outlets has rapidly increased along with the waistline of the young junk food generation. Highly processes foods are not only cheap but they are part of a globalized food system which promotes unhealthy eating. It's sad to think that the fast food generation could be the first in many many decades to have a shorter lifespan than their parents. 

There seems no way back either, as junk food has been shown by scientific research to be as addictive as drugs by stimulating the very same parts of the brain and obesity worldwide is now leading to 2.8 million deaths a year. But what can be done? Mexico has imposed a 5% tax on fast food and 8% tax on soda drinks and if theses taxes work in reducing consumption other nations will surely have to follow. But what about taxing the food industries profits for the associated health and social costs, maybe then they might consider promoting really healthy products.

So even in it's heartland the traditional Mediterranean diet is in decline, under attack by a globalized food system whose huge profits are at the expense of killing its customers. Large globalized companies by blaming parents, individuals or claiming they simply provide what customers want abdicate all responsilbilty whilst counting their increasing profits. A very similar story to that of cigarette multinationals who continued to deny any links with cancer for decades.