Powered By Blogger

Thursday 30 June 2011

Our own olive oil


The first step in producing your own organic olive oil is harvesting your crop. Black and green olives are usually harvested from November onwards in Cyprus. This is traditionally completed by hand, or by use of a small hand rake, with nets or plastic sheets placed on the ground, from the trunk of the trees outermost branches, to catch the falling olives. A ladder is needed to reach the higher olives and sacks or containers needed for transporting your crop to the storage area and later to the olive press.

The olives should be stored, spread on old sheets in a thin layer, somewhere where there is a good air flow until all harvesting is completed and should be turned daily.  It is also beneficial to clean your olives to remove bits of branch, leaves and dirt. This can be done by pouring the olives in a bucket from shoulder height into a large container, on the ground, and allowing the wind to blow away the debris whilst the olives fall into the container.  We completed our first olive harvest on November 17th 2010 which took the two of us a combined total of twenty-one hours and we harvested from our four mature trees a total of 214kg. 

Once harvesting and cleaning is completed, olives should be taken for processing to your local olive pressing mill.  Our 214kg of olives produced 47 litres of olive oil. This worked out at 1 litre of olive oil for every 4.6kg of olives picked. The pressing and containers cost us around 43EUR or 1.55EUR per litre of organic olive oil.

Because olive oil is high in mono-unsaturated fat, it storage period is longer than most oils.  Olive oil should be stored away from heat in a dark but airy area.  The best containers for storing your olive oil are dark glass or stainless steel but if its only for a short period food standard plastic will suffice. Containers will need a tight cap to keep out the air.  Your olive oil can be stored, if containers remain unopened, for up to 3 years after which it will start to go rancid.

Wednesday 29 June 2011

Freezing your home grown vegetables

It's best to enjoy your produce straight from the garden but you will always have a surplus and its nice to be able to enjoy your produce out of season which freezing allows you to do. Some crops are unsuitable for freezing such as salads, celery, cucumbers, kale, Jerusalem artichokes, leeks, peppers, potatoes and tomatoes. Although, other than salads and cucumbers, the rest can be frozen after cooking. Tomatoes are best frozen as juice or made into a sauce for use with pasta dishes.

Produce needs to be frozen as quickly as possible, to retain its flavour and nutritional value and this can be achieved by setting your freezer to a low setting for a few hours. Putting your produce in the freezer will cause the freezer temperature to rise but the lower setting will ensure it  freezes quickly.

To store your produce safely it needs to be blanched. Blanching ensures bacteria is destroyed, preserves texture, colour, flavour and helps retain nutritional values. Blanching is simply submerging your produce into boiling water to raise its temperature as quickly as possible which stops enzyme action. If not blanched, or for not long enough, the enzymes continue to be active causing toughening. 

Blanching is easier if you use a wire basket and a large pan. The produce should be completely immersed in the boiling water, for the times specified below, and then cooled as quickly as possible by plunging the wire basket into a bowl of very cold water. When completely cooled, allow the produce to drain and dry thoroughly before placing into portion sized freezer bags. 

Blanching times and preparation after thoroughly washing all produce:

Aubergines - Peel and cut into 2.5cm slices, blanch for 4 minutes
Globe artichokes - Trim to leave the hearts and blanch for 8 minutes
Beans - Select tender beans and blanch for 3 minutes
Beetroot - Cook until tender and freeze
Broad beans - Shell and blanch for 3 minutes
Broccoli - Trim off any tough stems and blanch for 4 minutes
Brussels -  Remove outer leaves and blanch for 4 minutes
Cabbage - Shred and blanch for 90 seconds
Carrots - Slice or cut and blanch for 4 minutes
Cauliflower - Break into sprigs and blanch for 3 minutes
Courgettes - Slice or cut and blanch for 1 minute
Marrow - Peel and then slice or cut and blanch for 3 minutes
Onion - Chop and freeze 
Parsnips - Peel, trim, cut and blanch for 2 minutes
Peas - Shell and blanch for 90 seconds
Spinach - Blanch for 2 minutes
Sweetcorn - Remove husks and blanch for between 4 and 8 minutes depending on size
Turnip - Trim, peel, cube and blanch for 2 minutes

Make your own juices and smoothies

Juicing for immediate use or freezing is an excellent method of using or preserving your fruit and vegetables gluts. 

Freshly pressed juices are not only delicious but provide the body with a boost of essential vitamins, nutrients and antioxidants. 

There are various types of machines for juicing. Electrical juicers, which can vary greatly in price, use either centrifugal or masticating force to extract juice. Alternatively you could purchase a hand-operated fruit press or juicer. Your choice depends on what fruit and vegetables you want to juice and the amount of juicing you intend to do. A juicer suitable for some juicing may not be as effective for other produce. Fruits, such as citruses (which are best peeled), watermelon, grapes, pomegranate and pears, generally have soft cell walls and hand pressing is a suitable method. However, vegetables generally have much tougher cell walls and juice extraction is usually only possible by use of a mechanical juicer. 

Most fruit and vegetables can be juiced and the combinations are endless. Good juicers include carrots, apples, beetroot, cucumber, tomatoes, cabbage, lemons, celery and ginger. However, almost all fruit are vegetables can be juiced but the amount of juice which can be extracted varies greatly. Experiment with your own combinations.  

We like carrot, apple and ginger and carrot, spinach, parsley and celery.

Try various combinations as it is difficult to produce something not drinkable.

Make your own ketchup

Making your own tomato, chilli sauce or other sauces from your own fresh produce is an excellent way of preserving your produce. The equipment needed is available in your kitchen and the only addition you may need is a good sieve to obtain the right consistency for your sauce. 

Bottled sauces made from low acid ingredients such as ripened tomatoes will need sterilising before long term storage to prevent fermentation. If you are only making a small batch and using it within a month sterilisation is not necessary or you may choose to freeze your sauce.


But if you are sterilising, this can be done using any deep pan, such as a pressure cooker, as long it is deep enough to completely cover the bottle and has room for a wire rack to ensure the bottle does not come in direct contact with the heat to avoid cracking. To sterilise your sealed bottles, you will need to bring the water to boil and simmer for at least an hour whilst ensuring the water level does not drop. 

The methods for sauce making will vary depending on your selected recipe but in all cases use ingredients that are ripe and undamaged. Wash thoroughly and remove any blemished areas. Always cook your ingredients slowly and stir occasionally. Press the pulped ingredients through a sieve and re-heat in a clean pan, adding any other suggested ingredients, before brining to the boil until thickened. Once ready, pour into pre-sterilised jars or bottles and seal.

Tuesday 28 June 2011

Drying fruit, herbs and vegetables

One of the oldest means of preserving food is by drying. This is easy in the warm and dry conditions of the Mediterranean where it is easy to use the sun to take the moisture out of the food.  Micro-organisms which cause food to decay cannot survive without moisture and by removing 90% of the water content your fruit, vegetables and herbs can be stored for later use.

Drying food will preserve many of the nutrients and your produce can easily be used after re-hydration, added to soups, casseroles, stews or enjoyed dry. There are a number of methods for drying your produce: by using a food dehydrator, solar drying, air drying or oven drying.

Try to select produce, for drying, which is at its best and cut to an equal size to ensure your produce dry's at a even rate.  Most vegetables should be blanched prior to drying to destroy enzymes. Whilst fruit can be dipped in a water mixture with added fruit or lemon juice, pectin, honey or salty water.  By dipping the fruit you will prevent oxidisation which darkens the fruit. 

Your fruit is generally dry enough when it is soft and leathery and vegetables are dry enough when they become crisp. Once dried, it is important to properly store your produce. Store in tightly closed jars and whenever possible fill these completely to keep the air out. Jars should be kept in a cool, dry and dark place and the produced used within 6 months. Dried fruits can be eaten dry and beans can be re-hydrated over night in water. To rehydrate other produce, simply pour over boiling water and allow to stand for a few minutes to a few hours depending on the produce or simply add dry to soups, casseroles or stews.

Methods of Drying

Food Dehydrator - is an appliance which uses heat and airflow to remove the moisture from the food. The price of an appliance can range from about 60EUR to 300EUR and is generally higher for larger capacity appliances. Before buying an appliance consider how much usage it will get, its electricity consumption and what size meets your needs.

Solar Drying - 
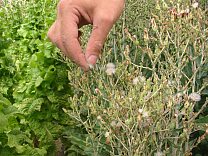
given the Mediterranean climate this is the most efficient and cost effective way of drying produce. Simply place your produce in single layers on non-stick racks, which allow full air flow, cover with netting to keep out insects and place in the sun daily until thoroughly dried. Drying can take from between 2-4 days depending on the daily temperature. Bring your racks in at night to stop dew forming on your drying produce. When nearly dry, move to the shade to complete drying and to avoid scorching.  After sun drying, and to ensure all insects are destroyed, it is recommended that you freeze your produce for three days. 

Alternatively, you can shorten the drying time by making a solar drier. I would recommend you research a design which suits your needs, there are numerous designs available and many use recycled materials or can be made using cardboard boxes. 

Air Drying - This is a very easy method and suitable for herbs. And it is very useful to have dried herbs available in the kitchen for herbs used regularly like mint, parsley and oregano. Pick your herbs and remove any withered, damaged or dead leaves. Gather together your herbs in bunches, tie at the stem and blanch in boiling water for a few seconds to remove any dirt or insects. Shake and leave to dry before hanging in a dry breezy place such as by a kitchen window. Drying normally takes two to three days. When dry crush the herbs, remove the stalks and store in an airtight jar in a dark and cool place.

Oven Drying - if you encounter a period without sufficiently high temperatures to sun dry this is a simple drying method. Place your produce, in single layers, on non-stick trays, or straight on the oven racks if large enough, and dry at 50c to 60c for between 4 to 10 hours. Regularly check for dryness and turn your produce to ensure even drying.

Vegetable Drying Guide - With the exception of onions and peppers, which should just be washed, wash and blanch all vegetables before drying. The following drying times are a guide and will vary depending on the drying temperatures and drying method used.

All types of beans - Stem and cut into 2.5cm pieces, blanch and dry for 6-8  hours
Beetroot - Cook, peel, cut into 8mm chunks and dry for 3-6 hours
Broccoli - Cut and dry for 3-6 hours
Carrots - Peel, slice and dry for 6-8 hours
Cauliflower - Cut and dry for 6-10 hours
Courgettes - Slice thinly and dry for 4-8 hours
Onions - Peel, slice 8mm thick and dry for 6-8 hours
Peas - Pod and dry for 6-10 hours
Peppers - De-seed, cut into uniform sizes and dry for 4-8 hours
Potatoes - Peel, slice thinly and dry for 6-10 hours
Sweetcorn - Remove from cob, blanch and dry for 6-10 hours
Tomatoes - Dip in boiling water and remove skins, slice and dry for 6-10 hours
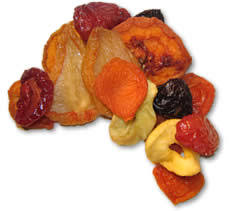
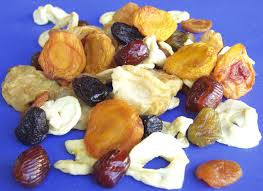
Fruit Drying Guide - select fruit which is blemish free and ripe but not over ripe. All fruit should be washed, pitted and sliced. Fruit can be soaked in a watered down solution with added lemon juice, pectin, fruit juice or honey for 5 minutes, prior to drying, which while help preserve its colour. The drying times are provided for guidance but will vary depending on the drying temperature and drying method used.

Apples - Peel, core, cut into thin rings. Blanch for 5 minutes and dry for 6-8 hours
Apricots - Cut in half and turn inside out . Blanch for 5 minutes and dry for 8-12 hours
Peaches - Peel, halve or quarter and dry for 6 - 15 hours
Pears - Peel, slice thinly and dry for 6-15 hours
Soft Fruits - Dry for 8-15 hours
Strawberries - Cut in half and dry for 6-12 hours
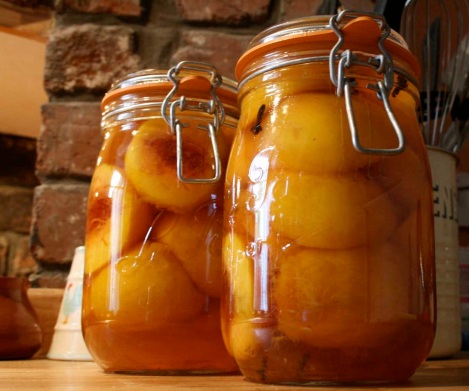
How to brew your own cider

Making cider is an easy way of preserving your apple harvest.  Any type of apple can be used to make cider but combining sweet and sour apples produces a better flavour. As a rough guide about 5-7Kg of apples will produce 4.5 litres of cider.

Harvest your fully ripe, undamaged apples which are not too bruised. Store the apples, in a cool place, for 2 weeks to allow the skins to soften and after 2 weeks wash thoroughly before crushing. Crushing can be done using a purchased fruit crusher or, if you are only making a small amount of cider, by smashing the apples with a wooden mallet after wrapping them in a cheesecloth. 

The next step is to press the pulped apples to extract the juice. If you are planning on making a lot of cider you might want to consider buying a press, or if you are a good DIY person you could build one  (plans are available if you google home made cider press) but for smaller quantities you can use a kitchen juicer or food processor attachment.

The extracted apple juice should be poured into a pre-sterilised fermentation jar. Initial fermentation can be very vigorous, so cover loosely until fermentation calms down. Then top up the jar with additional juice or water and insert an airlock.  

Natural yeasts will convert the fruit sugar into alcohol but the resulting cider will be very sharp. For a more palatable cider you need to control the fermentation process. This is achieved by using a general purpose wine yeast  and adding campden tablets (sodium metabisulphite) to kill off most of the natural yeasts. 

Once fermentation is completed, which can take from 2-8 weeks, siphon the cider into a pre-sterilised fermentation jar whilst ensuring the sediment is not transferred. Top the liquid to near the top with boiled water and re-fit an airlock. Store in a cool and dark place to allow the cider to clear. If more sediment forms the process will need to be repeated until the cider is cleared. 

If you prefer a sweeter cider, add approximately 500g of sugar to each fermentation jar when siphoning off the cider for clearing. Add an airlock and allow the cider to ferment for another 1-2 weeks and re-rack into a pre-sterilised fermentation jar. 

Once the cider is ready, siphon into plastic fizzy drink bottles and store in a cool and dark place.

Your cider will improve with age, so if you can refrain from drinking it, store for 4-6 months before drinking. 

Monday 27 June 2011

How to make your own chutney

Chutneys are a great method for dealing with surplus fruits or vegetables. Chutneys are made from chopped and cooked fruits and vegetables with the addition of dried fruits and are mixed with sugar, whole spices, vinegar and other ingredients into a smooth pulp by cooking slowly until thickened. There are endless combinations for ingredients and many recipes which can result in a hot, mild, sweet or sour chutney. 

To make chutney it's worth investing in a stainless steel preserving pan which unlike iron, brass or copper will not react with vinegar. The investment is well worth it as the pan can also be used for jam and pickle making. The basic method for all chutney recipes is to wash, peel and dice your fruit and vegetables and place them into the pan with the vinegar, sugar, dried fruit and spices. Stir until the sugar dissolves and simmer gently, without boiling, whilst continuing to stir occasionally until the ingredients are soft which takes about 2-3 hours. Pour into clean jars which have been warmed in a low oven and put on the lids immediately. Once cooled, label and store in a cool and dark place. Chutneys should be allowed to mature for three months before use but will improve with age and can be stored for at least two years.

How to preserve fruit by bottling

Bottling is a very useful way of preserving fruit gluts for use throughout the winter. Fruit selected for bottling should be fresh, firm and free from signs of disease. 

Hard fruits should be washed thoroughly and left to dry before preparation. Soft fruits should be soaked in a salt solution for five minutes to remove any insects or grubs and then left to dry before preparation. Bottling is best done using glass jars, such as the Kilner jars in the picture, which have airtight tops.

Prepare hard fruits for bottling in syrup as follows:-


(1) Apples and pears should be peeled, cored and quartered. 
(2) Apricots, plums, nectarines and peaches should have stalks removed and bottled whole or halved and the stones removed.
(3) Figs should be top and tailed and washed 

Prepare soft fruits for bottling in syrup as follows:-

(1) Strawberries should be hulled and carefully washed
(2) Blackcurrants, blueberries, cherries, raspberries and redcurrants should be de-stalked, washed carefully and any fruit showing maggot damage discarded.

Syrup:-

Prepare a syrup for packing fruit by using 250g of sugar for every 600ml of water. Dissolve the sugar, over a low heat, in 300ml of water and once dissolved add the other 300ml of water.

Pack the fruit tightly into pre-sterilised preserving jars and pour over the syrup. Tap the bottles to remove any air bubbles before sealing. Store in a cool, dry and dark area and enjoy through the winter.

Sunday 26 June 2011

Save your own seeds - turnip and oriental brasicca

Turnip and oriental brassica


Oriental brassica and turnip are sub varieties of the same family as turnip. This means that although they will cross with each other, or with turnips in flower, they won't cross with broccoli or cauliflowers.  Although you can only grow one of these vegetables for seed in any year, you can of course grow any of the others for kitchen use, so long as you don't allow them to flower at the same time as your seed plants. 

These plants are naturally biennials, producing their flowers and seeds in their second year of growth. Plants will usually flower in their second autumn but will need to be kept shaded and moist to survive the summer. Select at least 6 of the healthiest and most typical plants to reserve for seed and eat the rest.  In the second autumn, the plants will flower, and then form seedpods. 

The seedpods are green at first, but then gradually dry out and turn a pale tan colour. Once most of the pods are dry and brittle, cut the entire stalks of the plant, and lay out on a sheet undercover with a good airflow to finish drying.  Then rub and crush the pods with your hands to release the seeds before separating the seeds from the chaff with a coarse sieve. Seeds can be stored for 3 years in a cool and dark place.

Save your own radish seeds


Radish varieties will cross-pollinate so try to save seed from only one variety per season. Radishes are easy to save seed from and will produce seed the same year that you sow them. Keep aside one or two healthy plants and and allow them to produce seed stalks. The stalks can grow surprisingly large and bushy so allow sufficient room, about a 45cm, for the stalks to fully develop. The seed pods become pale brown and the stalks should be cut down when both the pods and stalks are dry and hard. The seeds can be removed either by cracking open individual pods or grating the pods through a sieve and then winnowing away the chaff to leave the seeds in a stiff breeze. Allow to dry for a few days before storing in a cool and dark place and your seed you last up to five years.

Save your own seeds - sweetcorn, tomatoes and peppers

Sweetcorn

Leave a couple of healthy and plump looking corns on a healthy and disease free plant for seeds. Cover your chosen cobs with paper bags and tie around the corn to prevent insects entering the bag. Remove the corns after allowing them to dry thoroughly, peel back the husks and hang somewhere, insect and rodent free, to dry completely. The seeds can be extracted by twisting the cob between your hands and picking out any remaining plant debris. Allow the seeds to dry for a few days before storing in a cool and dry place for up to two years.


Sweet Peppers and Chillies

Sweet peppers and chillies are both members of the same species.  Pepper flowers are self pollinating and will set fruit without any insect activity.  However, they will also cross readily and sweet peppers will happily cross with chillies.  You need to isolate your plants by around 50 metres from any other peppers or chillies growing nearby.

If you want to grow several varieties you could consider making an isolation cage to cover 3 or 4 plants.  This is easy to do and costs very little, especially if you can get hold of some old net curtain material.   

To save the seed, take peppers on your isolated plants which have ripened fully to their final colour (usually yellow or red).  Cut the peppers open carefully, and rub the seeds gently off of the 'core' onto a plate.  Wear rubber gloves to deseed chillies, as the chilli oil sticks to your fingers and is very hard to wash off. Dry the seeds in a warm but not hot place until they snap rather than bending and store in a cool and dark place. Capsicum and chilli seeds will keep for 5 years.

Tomatoes

Most modern varieties of tomato are self pollinating and will not cross.

To collect the seed, allow your tomatoes to ripen fully.  Then collect a few of each variety that you want to save seed from.  Slice them in half across the middle of the fruit, and squeeze the seeds and juice into a jar.  You then need to ferment this mixture for a few days - this removes the jelly-like coating on each seed, and also kills off many diseases that can be carried on the seeds. 


 To do this put the jar of seeds and juice in a reasonably warm place for 3 days, stirring the mixture twice a day.  It should develop a coating of mould and start to smell but after 3 days add plenty of water to the jar and stir well. The good seeds should sink to the bottom of the jar.


Gently pour off the top layer of mould and any seeds that float.  Then empty the good seeds into a sieve and wash them thoroughly under running water.  Shake off as much water as possible, and tip the sieve out onto glass plate (the seeds tend to stick to anything else).  Dry somewhere warm but not too hot, and out of direct sunlight.  Once they are completely dry, rub them off the plate and store in a cool dry place, where they should keep well for at least 3 years. 

Making your own apple pectin

We have planted a few apple trees which will hopefully start fruiting in the next couple of years. In the UK we had a couple of apple trees and used some of our crop to make our your own pectin which we used when making fruit jams or jellies.

To make your own you need about 1.5kg of slightly under-ripe green apples, any variety will do - last season we used some local native Cypriot apples, and wash them thoroughly. Slice the apples with the core and pips, place them in a litre of water with 2 tablespoons of lemon juice and boil until the mixture reduces by half.  Strain the mixture through a cheesecloth, re-boil for about 20 minutes and pour into a sterilised jar.


Once cooled store in a cool and dark place and your pectin will keep for about three months or freeze for later use. The amount of home made pectin to use when jam or jelly making will depend on the fruit or fruits used, if you mixture is not setting add more.

Saturday 25 June 2011

Vegetable harvest time

After all the hard work in the garden, it's the time of year when we start to enjoy the bulk of our vegetable crops. 


It is well worthwhile harvesting your produce daily to ensure you eat the freshest possible produce whilst at its tenderest and nutritionally most beneficial. Don't wait until vegetables are fully mature to start enjoying them, young legumes, salad plants, peppers, courgettes, spinach and many others can be used young and will encourage further growth. 

Vegetables harvested for storage should be thoroughly cleaned. Potatoes, sweet potatoes and Jerusalem Artichokes are best left in the soil until needed. Onions and garlic can be tied in bunches and hung in a dry airy position. Many legumes can be left to dry on the plant and the beans podded for storage when completely dry. Marrows, pumpkins and melons should be stored on shelving under cover in a dry and airy position. 

You will without fail have gluts of particular vegetables, and the glut is different every year, but these can be preserved in a number of ways: by drying, freezing, bottling or by turning them into chutneys, pickles, jams or by using some for juicing or wine making. For further details go to the following page
https://sites.google.com/site/cyprusgardener/home/preserving-and-storing-produce

Save your own seeds -peas


Peas are almost entirely self pollinating, only very occasionally crossing with other plants.  Set aside a section of row that is entirely for seed production.  To avoid physical mixing up of the seeds, separate different varieties of pea with another crop.  Check the row from time to time as the peas grow and pull up any plants that  are weak or not true to type.

Let the peas mature until the pods are brown and the seeds start to rattle.  Once the pods start to wither, dry  them further in the sun.  Once the pods are really dry, shell the peas out, label with the variety, date and store in a cool and dark place.  Pea seeds will keep for two years.

Save your own seeds - onions, leeks and parsnip


Onions and leeks are biennials and will not usually cross pollinate, so just grow them as a normal crop but keep aside some plants and allow them to produce flower stalks in their second year. Once flowered, watch carefully as once mature the seed pods can easily shatter. As soon as you can see the black seeds within the drying flowers you should cut off the head and allow them to continue drying in a paper bag. The seeds will fall to the bottom of the bag but gentle shaking will speed the process. Seeds left in the flowers can be removed by rubbing the flowers between your hands. Allow the seeds to dry for a period before storing and ripe onion and leek seeds should keep in a cool and dark place for up to two years.

Parsnip
Parsnips will cross-pollinate between varieties easily so save seed from one variety each year. Parsnips produce a tall flower stalk in their second year, so leave a number of roots in the ground. Pull up any roots which start to flower before the others or you will be saving seed prone to bolt. Parsnips produce little yellow flowers on their stalks which are followed by huge numbers of papery seeds. Harvest and allow to dry for a few days before storing in a cool and dark place. Parsnip seeds are best used within a year of harvesting.

Friday 24 June 2011

Save your own seeds - melons and cucumbers


All varieties of melon will cross but cucumbers won't cross with melons, but will cross with any other cucumbers or gherkins nearby.  It is possible, although fiddly, to hand pollinate both melons and cucumber flowers.  Grow plants under a fleece tunnel to exclude insects, and then hand pollinate the flowers on those plants with a paintbrush.  Make sure that you exchange pollen between different plants to keep the diversity of your variety. 

To harvest melon seed, pick the melons when they are ripe and ready for eating and keep indoors for a further day or two for the seed to mature further.  Then open the fruit, scoop the seed out, and wash in a sieve under running water.  Spread out on a plate to dry thoroughly. 
Cucumbers need to be ripened well beyond the edible stage.  They will become much fatter with green varieties will turn a dark yellow brownish colour and white varieties a paler yellow.  Keep for a week or so after picking to let the seeds mature fully.    Then cut open, scoop out the seeds and surrounding pulp into a jar, add a little water and stir well.  Leave  the jar on a sunny windowsill for 2-3 days for the seeds to ferment.  On the third day, fill the jar fully with water, and stir well again.  The good seeds should sink to the bottom of the jar, leaving pulp, debris and empty seeds floating on top.  Gently pour off the water and debris, refill the jar and repeat.  After a couple of rinses you should be left with good seeds at the bottom of a jar in clean water.  Drain off the water and spread out on a plate to dry well.

Both melon and cucumber seeds will last for 6  years if dried well and stored somewhere cool. 

Save your own seeds - brassica, carrot and lettuce

Brassica

Sprouting broccoli, cabbages, cauliflowers, kales and brussels sprouts are all members of the same family and will all cross with each other. So you only save seed from one member of the family in any give year and grow as many other brassicas as you like without problems so long as you don't let them flower. Keep at least six plants for seed, ideally more. Remove any poor specimens or any that are not typical for the variety, which you can eat, but don't allow any flowers to open. 

All of the brassicas, including cabbages, will throw up a tall flower stalk covered in lots of small yellow flowers. These will then form slender seed pods, which start out green and turn a straw colour as they mature and dry. Once they start to dry, keep a close eye on them as they tend to shatter and drop their seed.  Cut out entire plants as the pods begin to look dry and dry thoroughly indoors on a sheet.  Once completely dry the pods are easily shattered to release their seeds.  The seeds will keep in a cool and dry place for up to four years.


Carrots
Carrots are biennial, flowering in their second year of growth.  Foliage will die back but will then re-sprout and start to flower in the spring. 

Carrots grow into big plants producing successive branches with large flat umbels of flowers. 
To harvest your carrot seed, keep an eye on the umbels of flowers, and cut them off with secateurs as they start to turn brown and dry.  If you have plenty of plants, just save seed from the first and second umbels of flowers to appear on each plant, as these will give the biggest and best seed.

Dry the seed heads further inside, and then rub them between your hands or in a sieve to separate them.  You will notice that the seeds have a 'beard' which is removed in commercial seed to make them easier to pack. You can sieve the seeds further to remove more of the chaff but there is no need to get the seed completely clean, just sow more thickly with the chaff.  Carrot seed can be stored in a cool and dark place for up to four years.

Lettuce
Lettuce flowers are self pollinating and very rarely cross.  If you plan to save seed from more than one variety, separate them by around 4 metres or plant a tall crop between the lettuce rows.  
Select two or three good lettuces from your row, and mark them for seed.   It is very important not to save seed from any plants that bolt early, as you want to select for lettuces that stand well. Heading lettuces may need a little help for the flowering stalk to emerge; slitting the heads partially open with a knife works well.

Once the lettuces have flowered, the seeds will ripen gradually, starting in about a fortnight.   Harvest seed daily to get the maximum yield,  shaking into a bag. Or wait until a reasonable number of seeds are ready and then cut the whole plant.  Put it head first into a bucket, shaking and rubbing to remove the seeds  If you leave the whole cut plant upside down in the bucket somewhere dry, slightly immature seeds will continue to ripen over the next few days. 

Most of what you have collected in the bucket will be white 'feathers' and chaff.  To sort the seed, shake it gently in a kitchen sieve.  Some seeds will fall through the sieve, with the rest collecting in the bottom.  The feathers and chaff will rise to the top, and you can pick them off.  There's no need to get the seed completely clean; a little chaff stored and planted along with the seeds won't cause any harm.

If the seed feels a little damp, dry it further on a plate before labelling and storing.  Lettuce seed should keep for around 3 years, provided it is kept cool and dry. 

Thursday 23 June 2011

Save your own seeds - broad, French and runner beans

Broad Beans
Broad beans will cross pollinate with other broad bean varieties nearby, so if you want to keep your variety pure you will need to isolate your plants.  But if you are unconcerned about some cross pollination then save seeds from plants in the middle of your bean patch.  Always save seeds from strong and healthy plants. Let your broad bean seed mature and dry on the bush.  The pods will turn dark brown, dry and wrinkled.  Then pick and shell them.  Check that they are really dry, and if they are not, dry them further in the sun in a good flow of air.  Broad bean seeds should keep for two years but if you want fresh seed grow plants for seed every year.

French and Runner Beans
It is important to grow some bean plants specifically for seed, rather than simply collecting the left-over pods at the end of the season.  The plants should be good strong specimens and any that are less healthy looking or not true to type for the variety should not be used for seed productions.

French beans are self-pollinating but if you are just saving seed for your own use, grow your seed crop of french beans at least 2 meters away from any other variety (4 metres if possible) and you are unlikely to have a significant problem with cross pollination. Runner bean flowers need to be 'tripped' by wind or insects before the beans set, and are much more likely to cross with other varieties grown nearby than French beans.

To collect the seeds, allow the pods to mature fully on the plan until they start to yellow and dry out.  Then spread out somewhere in the sun with a good airflow until the pods are fully dry and brittle. Once they are dry, shell out the beans and dry further out of the pods.  Store in an airtight container.  If they are well dried and stored in a cool dark place, the beans will last around 2 years. 

If you have problems with weevils eating your seeds, put the sealed container in the freezer for a week immediately after drying the beans, this will kill any insect eggs before they hatch.  When you take them out, let the container come up to room temperature before opening it, otherwise the beans will absorb moisture from the air.

Save your own seeds - beetroot, chard and spinach

Beetroot, Chard and Spinach

Beetroot, leaf beet, perpetual spinach and chard are all members of the same family and will cross readily. They are biennial, and flower in their second year. Select a minimum of 6-8 plants to leave for seed and re-plant them in the spring.  As the seed stalks form, growing to over 1m high, tie them together and support with a stake.  Then as they develop cover the group of flower heads with a paper bag and shake the bag from time to time to make sure that pollen is distributed within the bag. 

As the large, prickly seeds mature, keep an eye on them, and start to harvest as they turn brown and start to dry out. You can either cut entire seedstalks, or harvest mature seeds by rubbing them into a bucket.  Make sure that the seeds are thoroughly dry before storage, and they should last at least four years.  

Wednesday 22 June 2011

Save your own seeds - basil, coriander and dill


Basil, coriander and dill are annuals, parsley is a biennial which  flowers in its second year of growth.

Basil seeds are ready to collect when the spikes turn brown and dry out.  Don't worry about the seeds dropping out - they are well attached, and actually need quite a lot of rubbing to free from the dead flower heads. 

With both coriander and dill, to get the best seed for sowing in future years, pull up and discard the earliest plants to bolt, and only save seed from those plants that produce plenty of leaf and flower late.   It is best to plan to save seed from early summer sowings, to allow plenty of time for the seed to mature and dry on the plant.   Harvest as soon as the seed is brown and dry, as it does tend to drop from the seed heads.  Rub the heads together in your hands over a bucket to free the seed.  Dill seed usually comes cleanly away from the seed heads.  Coriander seed tends to contain more chaff, but you can winnow it by pouring gently from one bucket to another in a light breeze if you want to clean it for kitchen use. 

To save parsley seed keep some plants aside till next spring when the plants will start to flower and produce seed.   Flat and curly leaved varieties will cross, as the flowers are insect pollinated, so you should only grow one type for seed at a time or use an isolation cage.  Harvest the seeds from individual flowerheads as they dry and turn brown, as they tend to drop from the plant when ready. 

Your harvested seeds will all keep for three years if stored in a cool and dark place.

Saving your own aubergine seeds


Aubergine flowers are mainly self pollinated, but can be crossed by insects.  So if you are planning to save seed, you should only grow one variety or use an isolation cage. 

To get ripe seeds let the fruits mature well past eating stage.  Purple and black varieties will turn a muddy purple-brown colour, whilst green and white varieties will turn yellowish.  Choose 1-2 good fruits on each plant to leave for seed.

To remove the seed, cut into quarters lengthwise, avoiding the core, and pull apart. The hard brown seeds should be obvious.  Put the quarters into a bowl of tepid water, and rub the seeds out with your fingers.  You may need to pull them apart to get all of the seeds.  Add more water, stir thoroughly, and wait a few minutes.  Good seeds will sink to the bottom, leaving debris and poor quality seeds on the surface.  Pour the debris off gently through a  sieve, then refill with water and repeat a couple more times.  

Eventually you will be left with good seeds in plain water.  Empty into a clean sieve, shake to remove as much water as possible, and then tip on to a plate and spread out well.  Put somewhere to sun dry but  mix occasionally to make sure that they dry evenly and don't stick together.  Aubergine seeds will keep up to 6 years if dried thoroughly and stored in a cool dark place.

Frugal gardening tips - simple ways to save money

It's easy to get carried away when starting out gardening and purchase expensive gadgets, tools, equipment and spend large amounts of money at garden centres. But there are alternatives and the following tips will hopefully go some way towards keeping the cost of growing your own produce to a minimum.

Start your plants from seed - Buying packets of seeds is relatively cheap in comparison to buying plants. Keep an eye out for end of season sales when most seed merchants reduce their prices. There are usually too many seeds in a packet to use, so consider swapping some of your seeds with gardening friends or join an exchange club which is a good way of halving the cost of your seeds. Once plants are growing, try saving your own seeds and you will have plenty of seeds for yourself, to swap or share with friends. You can even remove seeds, and successfully germinate them. from supermarket produce. This can save money on some expensive seeds such as cherry tomatoes and peppers. Don't throw out seeds just because the expiry date has gone, the germination rate will reduce but you may still get a 50% success rate from seeds where the expiry date is up to two years. After four years past the expiry date most seeds are no longer viable.

Keep some of your harvest for re-planting the following season, this works well with potatoes, Jerusalem artichokes, and garlic. You can also plant out any potatoes or garlic that have sprouted before use.  

Multiply your plants - By propagating and dividing plants, you can make more plants. Most plants can be propagated by one method or another and these can also be swapped with friends, allowing you to obtain plants you don't have and these can themselves, once established, can be multiplied into yet more plants. There are various methods of propagation and the choice of method is dependant on the plant. Always choose a healthy plant for propagating and research the appropriate method for the plant to be propagated before proceeding. Even with care, only between 60% to 70% of propagations will succeed. Before proceeding, you will need a sharp pair of secateurs, pots, rooting compost and rooting hormone. Always ensure your equipment has been thoroughly cleaned before re-use. 

Temperature control is a very important factor in ensuring successful propagation. The ideal temperature for most cuttings is between 10C and 21C. The easiest way to ensure a constant temperature is by using an electric propagator which will re-pay the initial outlay very quickly in producing new plants and also allow you a head start in seed germination.  

It is also important to ensure moisture is controlled by either placing and securing a plastic bag over the pot, by propagating cuttings in water or by regularly spraying cuttings placed in an electric propagator. 

Cuttings can be taken from softwood or hardwood depending on the plant to be propagated. Most perennials are propagated from softwood cuttings in the spring or summer. Always select new growth for cuttings and ensure the stem has not flowered or fruited. Take a 10cm to 20cm cutting just below a leaf joint  which has at least two leaf joints and insert half your cutting, after dipping in rooting hormone, into your rooting compost. Tomatoes can be multiplied by taking cuttings as stems readily root. 

Many fruit trees and bushes and vines, such as blackcurrants and grapes, are propagated from hardwood cuttings in the autumn or winter. Take 15cm to 45cm cuttings from new growth which has not fruited or flowered and with at least two leaf joints. These can be rooted directly in the ground or in containers outside, after brushing the tip with rooting compound, and will root, depending on the parent, in between two and twelve months. 

Bud cuttings are used for plants with long stems. such as grape vines. Remove a section of stem between two leaves and insert, after dipping in rooting compound, below a bud into your rooting compost. Alternatively, take 8cm cuttings with a bud in the centre. Remove a slither of wood on the opposite side to the bud and insert horizontally into a mixture of sand and peat with the cut edge downwards. Just cover the cuttings, place in a propagator and germination usually occurs within 2-4 weeks. Pot-up the plants once leaves appear and once established plant out.

For plants consisting mainly of leaves, with very few or no stems such as the prickly pear, leaf cuttings may be used for propagation. Cut off a fully mature leaf and cut sections of 2.5cm across the leaf and, after dipping in rooting compound, insert upright halfway into rooting compost. 

Root cuttings are used to propagate some trees, shrubs and herbaceous perennials such as the passion flower. Expose the roots and take cuttings of 2.5cm to 7.5cm from roots which are at least 0.6cm thick. Cut flatly at the top of the root and diagonally at the bottom end, the cutting should be fully inserted into the rooting compost with the diagonal end first. 

Plants such as strawberries and globe artichokes can be propagated by planting off-shoots. Strawberry offshoots can be placed into pots and cut away from the parent once established. Globe artichoke offshoots can be detached carefully from the parent, replanted and kept well watered until established.
Layering can be used for plants such as rosemary, jasmine and fruiting bushes such as kiwi and blackberry. Bury the tips of stems and after a period roots will develop on the buried tip and the new plant can be detached from the parent. 

Removing suckers, from figs and raspberries for example, is another propagation method. Carefully expose the base of the sucker and cut as close as possible to the parent. Plant as soon as possible after removal and keep well watered until established. 

Division is a further method of propagation and can be used for plants such as lemongrass and comfrey. Use two spades to split established plants down the middle and replant. 

Free Containers - Do not throw out containers such as milk or juice cartons, cardboard egg boxes or toilet rolls. These can all be re-used for sowing seeds. Toilet rolls are good for raising peas, beans and even beetroot, which does not like being transplanted, just fill the toilet roll with compost and when the seedlings are strong enough plant out. The toilet roll will help retain moisture and eventually rot away. Cut off the tops of cartons, wash out and cut drainage holes in the bottom to use as pots. The bottom section of egg boxes can be filled with compost and used to raise seedlings. Like toilet rolls, these can be cut apart and planted into the soil where they will rot down. You can even try making your own pots from newspapers by rolling round a cylinder and folding  into the base to secure. 

Manure, compost and mulch - To keep your gardening costs down, make your own compost, obtain manure from friendly farmers of livestock keepers and use a variety of materials for mulching. Mulches can be made from shredded newspapers, seaweed, coffee grounds, hay, leaves, sawdust, wood shavings and black plastic.    

Organic Pest Control - Don't rush out to buy expensive organically safe products when pests or diseases appear, firstly try and make your own insecticides and pesticides. There are lots of recipes available on the internet.